


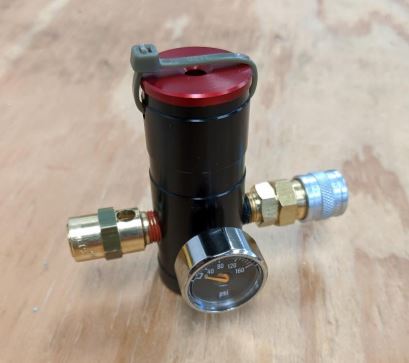
Thank you for purchasing the Redline Airsoft, Mini SFR (Super Fast Refresh) low pressure regulator! Like the full sized SFR, the Redline Mini SFR is the only fully balanced Airsoft regulator in production. The Mini SFR has an extremely fast refresh/recharge rate and response time. It can use both high pressure and SLP type air tanks and can accept input pressures up to 900 PSI.
Installing the air tank: Simply screw the air tank into the integrated tank adapter on the bottom of the regulator. A little Tech-T or other non-petroleum based grease on the tank oring and threads will help ease installation and removal of the tank.
Removing the air tank:
Unscrew the air tank at least 1 full turn. Then, vent the residual air pressure in the reg by installing
and un-installing the air line or gun end adapter several times.
Once the Mini SFR’s gauge reads 0 psi you can easily remove the tank.
Adjusting the Redline Mini SFR regulator: The output pressure of the Mini SFR is adjusted by inserting the provided 3/16th Allen wrench into the hole in the red adjuster cap. The pressure adjustment is sensitive, when adjusting do not over adjust! Shoot the gun several times after any adjustment to the regulator to allow the air pressure to stabilize! Increase output pressure: Using a 3/16 allen wrench turn, the adjuster clockwise to increase the pressure.
Decrease output pressure: Using a 3/16 allen wrench, turn the adjuster counterclockwise to decrease the pressure. (The regulator will not self-relieve, you must shoot the gun after you adjust the reg to allow the pressure to decrease!)
Safety systems: This air system features an over pressure safety system. There is a high flow relief valve mounted on the regulator. The valve will begin to vent at approximately 140 PSI and fully open at approximately 175 PSI. This prevents a system over pressure in the event of either a regulator malfunction or an accidental operator over-adjustment of the regulator
Lubrication: This regulator is designed to use Tech-T Gun Sav. This is the same lube used on your HPA Engine. Some lubes can swell the Orings, so it is important to always use a non-petroleum based lubricant. We recommended that you disassemble, clean and grease the regulator once or twice a year under normal use.
Integrated Tournament lock: To use the Tournament lock, have the chronograph official insert a wire tie through the 2 holes in the end of the regulator and over the adjuster cap. This will block off access to the adjuster and secure the cap to the regulator.
Good Practices:
Whenever you first pressurize your air system, it is recommended that you have the airline
disconnected from the HPA Engine. Check the output pressure gauge on the regulator and be sure it
is holding steady somewhere below 140 PSI before connecting the hose to the Engine.
High pressure air is a very stable power source. Once the regulator is broken in and the guns velocity
is set, there should be very little need to adjust the regulator during the course of the day. If the gun
seems to be losing velocity or "acting funny" in any way always check your HPA tank pressure and
refill your HPA tank before adjusting the regulator!
Warning!! Never use your regulator with the adjuster cap off! With the cap off the velocity adjuster can be adjusted out too far and shoot out under pressure!
Mini SFR Regulator disassembly, lubrication and reassembly: Before disassembly, remove the air tank from the regulator! Vent any residual pressure in the regulator by partially attaching the hose into the quick disconnect until the output pressure gauge shows 0 PSI. Do not attempt to disassemble the regulator with the system still pressurized!
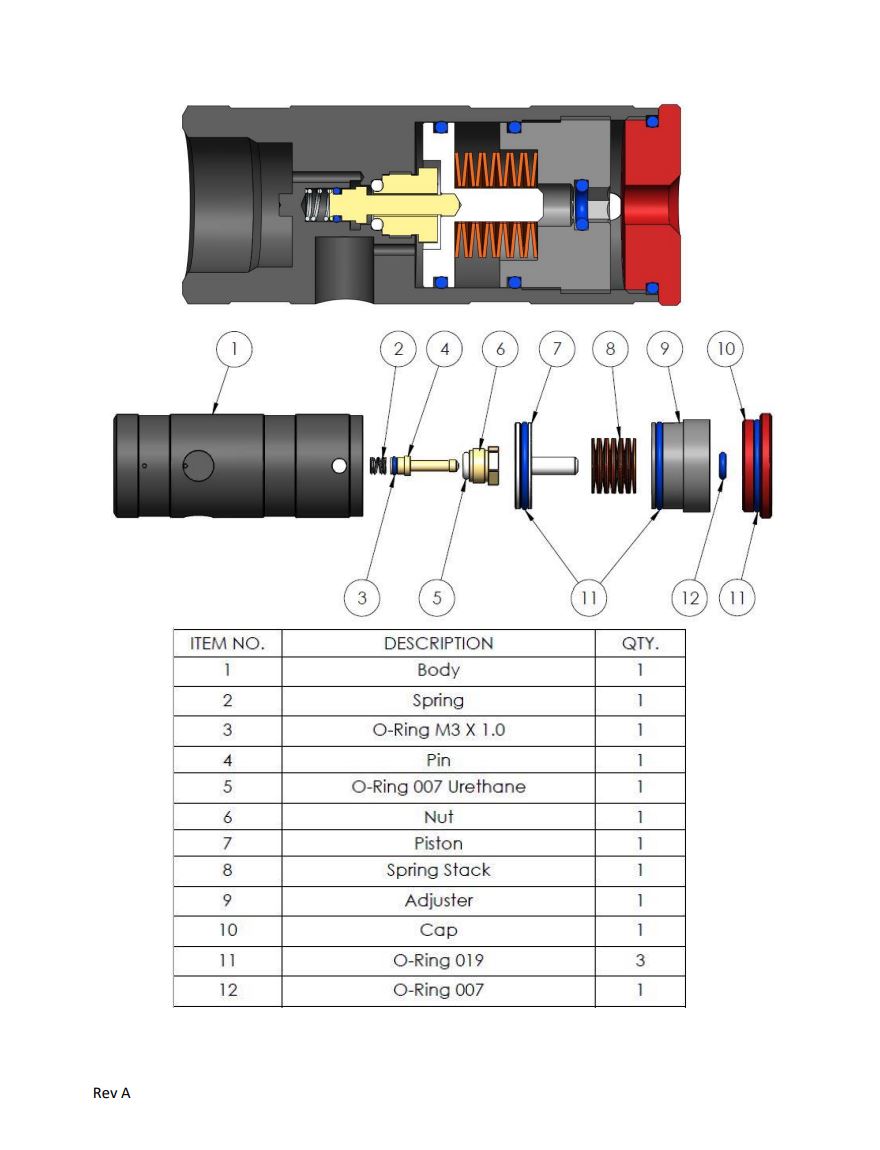
Disassembly: 1: Unscrew and remove the Adjuster Cap (10). 2: Using a 3/16in Allen wrench, remove the Pressure Adjuster (9). 3: Remove the Disc Springs (8) from the Piston shaft.
Important! Install the gun end fitting into the quick connect on the reg body. This will break the vacuum on the inside of the regulator and allow you to remove the piston. 4: Use a pair of needle nose pliers to remove the Piston (7). 5: Use a 3/8ths socket to remove the Reg-seat Oring Nut (6). 6: Remove the Reg Pin (4), Coil Spring (2) and Reg-seat Oring (5) if it did not come out with the Nut. 7: Thoroughly clean any old grease and dirt from inside the reg.
Reassembly: 1: Replace any Orings as needed. 2: Lightly lube the center bore of the Mini SFR with Tech-T grease. 3: Install the Coil Spring into the center bore. 4: Install the Reg-seat Oring onto the nose of the Nut. 5: Lightly lube the Reg Pin Oring and install the Reg Pin into the hole in the Nut. 6: Using a pair of needle nose pliers, grab the end of the Reg Pin and lower the Reg Pin/Nut assembly into the reg body. 7: Grab the Nut by the flats with the needle nose pliers and carefully start threading the Nut into the reg body. Do not cross thread the Nut! 8: Tighten the Nut with the 3/8ths socket. 9: Apply a liberal amount of Tech-T Gun Sav to the Piston Oring and Piston bore. Then reinstall the Piston into the regulator body.
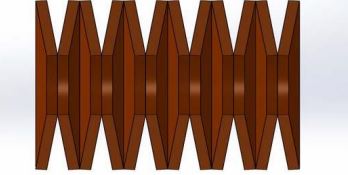
10: Reinstall the spring stack on to the Piston shaft. Be sure the Spring Stack is correctly installed on the Piston. Poor performance will result if the springs are installed incorrectly. There should be 5 opposing pairs of spring disks and a single opposing spring on top and bottom of the stack. The disk springs should be assemble as shown:
11: Lightly grease the threads on the Pressure Adjuster and install the Pressure Adjuster and
Adjuster Cap